Easily Change All Data Sources from Excel to SQL Server
This blog post will show you how to Easily Change All Data Sources from Excel to SQL Server in a given solution.
The idea of using power query parameters to rapidly change which data sources your tables are coming from, has been around for a long time. What we are going to do in this blog post is to take that concept and extend it; so that we can use parameters, not just to change the data source, but to change the data type.
So, in this example, we are taking the scenario where we start a project, and work in with flat files coming from Excel tables. But, when our database credentials are available, we then want to switch the solution so that we are working from live tables coming from a SQL Server database.
So, before we build a solution, let's look at the finished version.

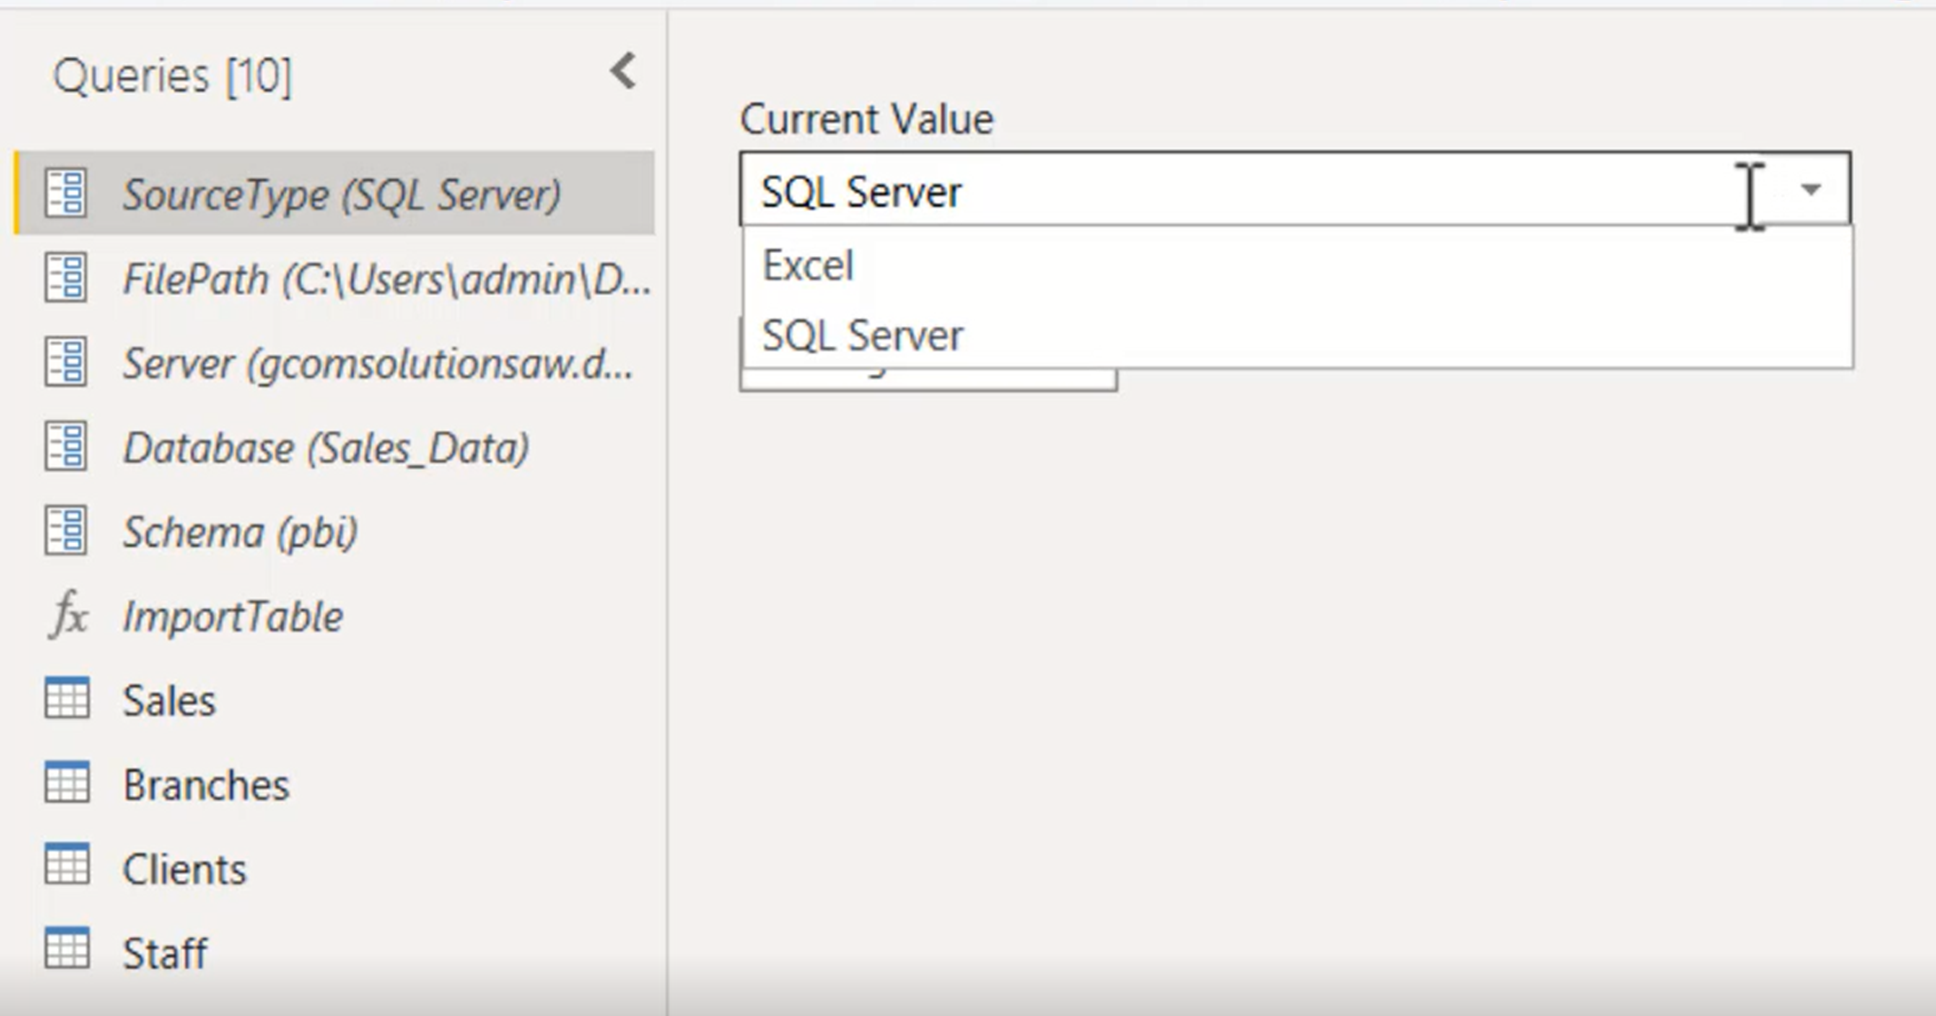
First, we have five parameters.
The first parameter allows you to choose either SQL Server, or Excel. And, as you do so, the source of all your tables will change accordingly.
We have four tables imported; and they're now coming from an Excel worksheet. If we switch the first parameter back to SQL Server, these same four tables are now coming from a SQL Server database.
So that is the purpose of our first parameter.
The second parameter shows us the file path of the Excel workbook that we're getting the data from.
And then we've got three parameters to specify the SQL Server database: first of all the server, then the name of the database, and then the schema in which the database tables reside.
So, that's our five parameters. And then we have a function, which references all of those parameters; and which contains some conditional logic to check the source type. In the function, we use the values in the parameters to either connect it to an Excel workbook, or to a SQL Server database.
In a blank Power BI Desktop file, let's click on transform data to launch the power query editor. And let's begin by creating our five parameters. So, Manage Parameters … New Parameter.
Let's start with the SourceType parameter, which will allow us to dictate whether the data is coming from Excel or SQL Server.
The data type will of course be text.
And for suggested values, we can choose list of values and enter the two possibilities, which will be either Excel or SQL Server. And then we need to specify a current value; so, let's set it to “Excel”.

Next, let's specify the file path. So new parameter; and we'll call it Filepath; and, again, the data type is Text. However, this time, we'll leave it on Any Value and paste in the path to the Excel file.
Next, let's create the three SQL Server parameters. First of all the server name, which is text; and we enter in the name of the server.

Then, let's specify the database name. And in this case, our database is called “Sales_Data”.

And finally, the Schema. In this database, we're bringing in some views inside a schema called “pbi”.

And that completes the first stop; we've created our five parameters. Let's click OK and move on to our next step, which is to create the function which will use all those parameters to pull in the appropriate data.
To create a function from scratch, we simply create a blank query: so, New Source … Blank Query. Let's rename the query import table. And then we open the advanced editor to write our function. And the purpose of this function will be to retrieve a single table, from the specified Excel workbook, or from the specified SQL Server database.

let's call the function “Get Data”. And, to write an M language function, we begin by specifying the required parameters, which need to go inside parentheses. In this example, our function needs just one parameter: the name of the table to be imported. So, let's call the parameter “Table Name”.
And then we use the keyword as to specify that this is a text parameter. Having specified the input required by our function, we specify the output that it will produce. This function will produce a table; so, after the closing parenthesis, we use as table.
Next, to specify what the function will actually produce. We insert the arrow symbol by typing an equal sign, followed by greater than (=>).
And then we use the same let … in syntax that has been used in the main query. And the first thing we need to define is the source. But of course, the source will be conditional, it's going to depend on the current contents of the source type parameter. So, we need to use a simple if statement.
                    if SourceType = "Excel"

                    then Excel.Workbook(File.Contents(Filepath))

                    else Sql.Database(Server, Database
If the SourceType parameter contains “Excel”, then we need to use Excel.Workbook; and, to specify the workbook, we use File.Contents. Then, to specify the path, we simply make a reference to our Filepath parameter.
So that's what we do. If the source type is Excel. Else, the source type can only be SQL Server, in which case, we need to use Sql.Database. And this function takes two parameters, the server and the database. So, of course, we simply make a reference to our two parameters of the same name: first argument is Server; and the second, database.
So that specifies our data source; the container of the data that we're interested in. Now we need to navigate to the table which we want to import.
Let's define a variable called “OutputTable”. And we'll use exactly the same pattern.
If the SourceType parameter contains “Excel”, then we will be navigating to an Excel table.
The Excel.Workbook function, which we used, and which is being held in our Source variable, produces a table of metadata. So, the normal navigation from that point is to identify which row within that metadata table you want to import. And you do that by specifying the value for the Item and Kind columns.
That takes you to a given row. And then on that row, you expand the entry in the data column. The data column contains all the tables that have been retrieved from the Excel data source. You navigate to the required table via the Data column.
Converting that into M language code, we start by drilling inside the Source variable.
And we effectively treat it as a list of records, specifying a list by using curly braces. And then, to navigate to a particular row in that list of records, we use square braces.
So that syntax will take us to a given row within our metadata table. Then, to expand the Data column of that row, we use square brackets Data.
            OutputTable =

                    if SourceType = "Excel"

                    then Source{[Item = TableName, Kind = "Table"]}[Data]
That's what we do if the Source Type equals “Excel” and we use a similar statement for SQL Server. So when we use Sql.Database, we end up with a similar metadata table, and we navigate to a particular row of that table by specifying the Schema and the name of the Item. That will take us to the row. And then, as with the Excel metadata table, we then expand the Data column to import the contents of that table.
So very similar syntax.
else Source{[Item = TableName, Schema = Schema]}[Data]
Again, we start with Source. And we treat the source metadata table as a list of records. We navigate to a particular row of that metadata table by specifying the Item; which, again, will equal our TableName parameter. And this time, we then look at the Schema column. And that, of course, will be pulled from our Schema parameter. And then, once again, we get to the table, we expand the Data column .
So, now we have a table. And we can now complete our function by specifying the variable which the function returns. And of course, that's going to be the OutputTable variable.
And then to finish off our query, we specify the variable which is returned by the query. And for that, of course, we simply use the name that we assigned to our function, which is GetData.
The entire function is shown below.
let

    GetData = (TableName as text) as table =>

        let

            Source =

                    if SourceType = "Excel"

                    then Excel.Workbook(File.Contents(Filepath))

                    else Sql.Database(Server, Database),

            OutputTable =

                    if SourceType = "Excel"

                    then Source{[Item = TableName, Kind = "Table"]}[Data]

                    else Source{[Item = TableName, Schema = Schema]}[Data]

        in

            OutputTable

in

    GetData
We can now use our function to import our tables. And of course, where we are importing them from is determined by the current value of our SourceType parameter. Let us say that, in this scenario, when we start our solution, only the Excel version is available.
To import each table, we simply input the name of the table in the box provided and click the Invoke button. We use this technique to import five tables: Sales, Clients, Products, Staff and Branches.
Since our SourceType variable was set to “Excel”, these five tables have all been imported from an Excel workbook
However, assuming that we have exactly the same tables, and the same table structure, in the SQL server version, then at any time, we can go into our SourceType parameter, switch the current value from Excel to SQL Server, and will now have exactly the same tables which come in from SQL Server rather than Excel.
That's it. That is how you use parameters to be able to switch all the data sources in your solution from Excel to SQL Server.